My blog for Full Stack Web Development
===
## Introduction
My name is Lee C. Degeilh. I enrolled H2C program at Kajaani AMK in 2020 autumn. Here is the link to my projects in KAMK: https://gitlab.dclabra.fi/Lee-Lilly
So far I have completed DevOps and Cybersecurity (1 & 2), and currently work on Full-stack web development and Embedded Python in IoT technology.
## Module 1 - Introduction to web development
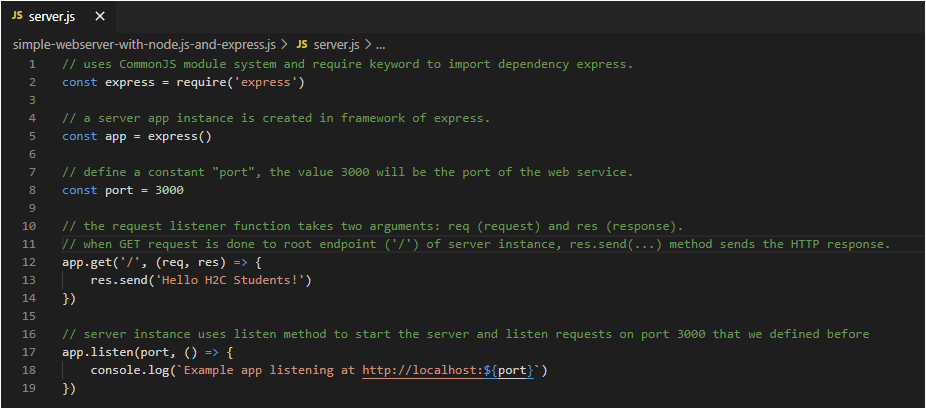
### A Simple Web Server
Some new knowledge about Node.js are presented in the course material of [Full Stack Web Development](https://devmoodle.kamit.fi/course/view.php?id=2799#section-1), yet starting simply with "Hello World".
### DevTools used
- Node.js (an open-source javascript runtime environment https://nodejs.org)
- Node is useful for developing applications that require a persistent connection from the browser to the server and is often used for real-time applications such as chat, news feeds and web push notifications.
- Express.js (a Node.js framework with HTTP utility methods and middlewares https://expressjs.com/)
### Gitlab - create a project
Since I already have an account in https://gitlab.dclabra.fi (with KAMK.fi credential), and established SSH authentication, what I need to do is to create a new project, named as "Simple Web Server with Node.js and Express.js".
The details of established SSH authentication check my blog in https://gitlab.dclabra.fi/wiki/s/SkKDxfkUw.
Create a local folder for our project.
> mkidr FullStack
> cd FullStack
Clone the remote repository to local repository.
> git clone git@gitlab.dclabra.fi:Lee-Lilly/simple-webserver-with-node.js-and-express.js.git
> cd simple-webserver-with-node.js-and-express.js
> touch README.md
### NodeJs initiation
Node.js project should have package.json file, a kind of receipt for our project, where we define name, version, dependencies, route and other critical information.
Use following command to initiate the project, which generates package.json file for us.
> npm init
The command will prompt different questions like name, version etc. Just simply accept the default values for all fields. After the command is invoked, we have package.json file in our repository folder.
> code .
Open the repository folder with VSCode to edit package.json file (https://gitlab.dclabra.fi/wiki/s/S19LWaSFP#), and save.
Create our main javascript file and we name it "server.js".

### Express - create a server instance
Install the Express under the repository folder.
> npm install express --save
In file package.json, "express" is added to the field of "dependencies" with version info.

Edit server.js file (https://gitlab.dclabra.fi/wiki/s/S19LWaSFP#)
Run app locally, use following command in VS terminal.
> npm start


### Docker
About Docker, questions like "What is docker?", "How to docker?", please refer to my blog of ***Docker for DevOps*** on gitlab wiki https://gitlab.dclabra.fi/wiki/s/SkKDxfkUw#
Somehow, in that blog, the docker installation was missing. We can give more details here.
### Docker Installation
Docker Engine for Windows can be downloaded from https://hub.docker.com/editions/community/docker-ce-desktop-windows/.
Enable ***Windows SubSystem for Linux*** and ***Virtual Machine Platform*** in the "*Control Panel*" -> "*Progaram*" -> "*Turn on/off features*", which permits virtualization of a subsystem on Windows, often used for running Linux on Window.

Then **Restart computer** to make features take effective.
Since I am using Windows 10 Home version 20H2, I will need to download and intall WSL update patch WSL2 ["wsl_update _x64.msi"](https://wslstorestorage.blob.core.windows.net/wslblob/wsl_update_x64.msi).
Then set WSL2 as default version use Windows CMD.

Follow docker intallation wizard, when prompt settings, enable WSL2 backend engine and allow docker run at log in, complete installation and restart computer.
Docker appears on Desktop, and use Windows CMD to verify engines.

Now everything up and running!
### Docker Run
Go to our project folder, create a Dockerfile and edit in VS.


Write a ".dockerignore" file to prevent local modules and debug logs being copied into docker image.

Build image with
> "docker build . --tag test/simple-web-server"

Verify the image and run image by projecting local port 3000 to the same port inside the image.
> "docker run --name simple-web-server -p 3000:300 test/simple-web-server:latest"

When running the image, a container is generated, get into the container to navigate with Bash shell.
> docker container ls -a
>

> docker exec -it <containerID> /bin/bash
>

Open the web browser for localhost:3000

***
## Module 2 Telnet and Node.js Socket
### Dockerized Telnet communication
> ➜ 🐳 docker run -it --name telnet-test ubuntu:18.04 bash
> apt update
> apt install telnet
> telnet irc.quakenet.org 6667
> 
After connection to server is etablished, ...

There are many servers on https://www.quakenet.org/servers, they come in random via telnet.

Let JOIN a channel on QuakeNet IRC Netwokr via telnet
> JOIN #kamk.h2c

We can send a msg to everyone on the channel
> PRIVMSG #kamk.h2c :Hello!
> PART #kamk.h2c :See you later!
>

> QUIT
>

The same thing can also be done via https://webchat.quakenet.org

### NodeJS net.Socket
The net module provides an asynchronous network API for creating stream-based TCP or IPC servers (net.createServer()) and clients (net.createConnection()).
A net.Socket can be created by Node.js and passed to the user when a connection is received. For example, a net.Server with socket stream opens on port 8082, and client can connect to the port and send data.


### Telnet via net.Socket
#### **App 1: Echo Server** (https://gitlab.dclabra.fi/Lee-Lilly/tcp-echo-server)
- User can connect to the server on port 3000 via telnet protocal.
- User can send data to server and server sends it back.

#### **App 2: Chat Server** (https://gitlab.dclabra.fi/Lee-Lilly/tcp-chat-server)
- User can connect to the server getting a random Id.
- User can register **an unique username** on the server. If user register a new name, the newer one automatically replaces the older one.

- User can search for other connected users on the server.
-
- User can send msg to any single user if user is connected.

- User can send msg to all connected users.


### **Differences between Microsoft telnet and Linux telnet (*own experiences*)**
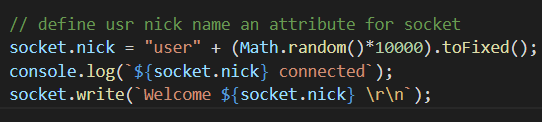
Above picture shows that App 2 runs on Microsoft Telnet, it has some differences from the Linux/Unix telnet.
In App 1, the differences is obvious, the socket pipes back each character (keystroke), instead of whole sentence.
The major difference is that "RECIEVED DATA" in Microsoft Telnet are **byte by byte** (character by character).


The following code adds the character together, push them to the command array only when keyboard hit is "space" or "return".

The Microsoft Telnet seems very clumsy. Any key stroke is recorded, and can only backspace and edit in "insert" mode.
**Questions:**
1. Is Microsoft Telnet represents the original manner of data receiving and sending of net.Socket, and Linux Telnet has implemented inner mechanism to re-construct the bytes? I remember that during a cybersecurity course, playing as a middle-man to catch the data sent btw the server and the client via Telnet or SSH without using key-pair, I saw data came byte by byte (character by character).
2. If Docker is for dev purpose and totally in Linux environment, the developer may not notice the differences between the two systems. Is this sufficient for releasing a fully-trusted product, knowing that most PC users are based on Windows?
***
## Module 3 MongoDB and NodeJS
- **mongoDB**: MongoDB is a cross-platform and open-source document-oriented database, a kind of NoSQL database. As a NoSQL(not only SQL) database, MongoDB shuns the relational database’s table-based structure to adapt JSON-like documents that have dynamic schemas which it calls BSON(Binary JSON).
- **mongodb**: the official mongoDB driver for NodeJS.
- **mongooseJS**: Basically, it is a package that we will use to interact(query, update, manipulate) with our MongoDB database in our nodeJS app. We would install or ‘require’ mongooseJS in our app with NPM(node packaging manager).
### App: president
**Prerequesites**
- Run MongoDB Service
1. Install MongoDB on Windows run the service
**OR**
2. Dockerizing MongoDB run in Linux ubuntu
- NPM init and install dependencies (see *package.json*)
> npm init
> ...
> npm install mongodb
> npm install mongoose
>

- Create a database with MongoDB
If the MongoDB is installed on Windows, and MongoDB service is running, you may find desktop MongoDB management application **MongoDB Compass**. We can use it to create a database on **localhost:27017** (the *default port* running MongoDB Service locally), and populate the database with imported JSON file.


**Connect MongoDB to App**
Connect MongoDB with Node JS, we need *Mongoose* package, and call *connect()* function and passes MongoDB Database URI as argument to the function.

and run the app file **server.js**


Then go on "**localhost:8080**", press "***load presidents***"


### Dockerizing all services
We have a **docker-compose.yml** file placed in the project root directory "**/presidents**", which "**glues**" the database and the server together.

According to defined services in the *docker-compose*, we need to change **localhost** to the named service on both database.js and server.js.


**Build and Run the docker containers**
- **Step 1:** Go to project root "/presidents", build all services. Magic action! :+1:
> docker-compose up --build

- **Step 2:** Open *Docker Desktop*, check on "presidents" (**president-network**), it shows three containers are running, if we are lucky. :+1:

Now browse to locahost:8080 and press "load presidents", we get only the table headers, without data. So we need to put real data into MongoDB.
- **Step 3:** Populate data to database.
We have another Dockerfile placed in the directory of "**/utilities**", which **does two things**:
- copy data file "president.json" to the container.
- install "curl" tool that would be used to populate the JSON data.

go to container "president-utilites" with CLI


Now, the web "localhost:8080" loads up all presidents data. Bravo! :+1:

***
## Module 4 Brief on Vue JS
### What is Vue JS?
Vue is a **progressive** JavaScript framework for **Single Page Application (SPA)**, or can be used to create stand-alone widgets, e.g., signup form.
Other equivalent frameworks are REACT and Angular. In many aspects, they share similar concepts, e.g. **properties and states, props and components, etc.**.
In contrast to Angular and React which are in huge part determined by Google and Facebook, **Vue was created by a single person - Evan You.**
**Vue is open-source** (circulated under the **MIT license**) and driven generally by its community.
### What is SPA?
- Only the first page is entirely loaded from server to broswer in response to the user request.
- Vue intercepts the subsequent requests and handles the **routing in the browser**.
- The web page is dynamically rewritten with new data from the web server, instead of reloading an entire page to the browser.
- Results in a much faster and smoother website experiences.
### Vue Js and PWA
- **PWA**, stands for [Progressive Web App development.](https://www.freecodecamp.org/news/practical-tips-on-progressive-web-app-development/#:~:text=In%20the%20simplest%20terms,%20a%20progressive%20web%20app,function%20similarly%20to%20a%20mobile%20or%20desktop%20app..)
- Vue JS has **Reactivity system**, which allows fast render, test data on fly in browser.
- Vue **core library is focused on the view layer only**, and is easy to pick up and integrate with other libraries or existing projects.
***
## Module 5 Build App with CDN (without bundle)

Let's follow [Intro to Vue 3](https://www.vuemastery.com/courses/intro-to-vue-3/class-and-style-binding-vue3), the lecturer summarized the basic features of Vue3 shown as below, and **my solutions to challenges** at end of each session can be found in the **start code** at [Gitlab.dclabra.fi/Lee-Lilly](https://gitlab.dclabra.fi/Lee-Lilly/vue_learning/-/tree/master/Vue_3_Intro_end_codes_and_solutions)
### 1. **How Vue works?**


### 2. **HTML Attributes bind with data**

### 3. **Conditional rendering of data**


### 4. **Render a list of data**


### 5. **Event listening**

### 6. **Style binds with data**


### 7. **CSS class binds with data**


### 8. **Computed Properties**

***property***

***property state change over the course***

***computed property***

***render in html***

### 9. **Components and Props**
**Two main characteristics of Vue props:**
1. Props are **passed down** the component tree to descendents (**not up**)
2. Props are **read-only** and cannot be modified.
***index.html***

***main.js***

***productDisplay.js***

***template:***

***computed property***

***productDetails.js***

***render in productDisplay as a sub-component***

### 10. **Event emitting**


### 11. **Two-way data binding**
For interactive form, HTML template must be able to bind user input to the App data.

### VS code extensions for Vue app development
**Vetur**: supplies Vue JS language features (syntax highlighting, IntelliSense, snippets, formatting) to VS Code.

**Live Server**: extension for VS code, load any HTML page in a development virtual server. Fast for testing views.

## Vue.js devtool Extension for Chrome and Firefox

**Open** "..\Intro-to-Vue-3-final\index.html" in **Live Server**, and **inspect** in Chrome browser.

***
## Module 6 Build Vue App with Webpack bundle
### Installation (using npm or yarn)
> npm install vue@next
**OR**
> npm install -g @vue/cli
### Project creation (using GUI or CLI)
> vue ui
**OR**
> vue create *AnyAppName*


### Basic project structure explained

- **public/** : contains *"index.html"* sent to browser initially.

- **src/** : contains the application source code.
- **./assets/** : images and fonts for app.
- **./components/** : building blocks of our Vue app.
- **main.js** renders App.vue component (and everything nested within it) and mounts it to the DOM.
- **App.vue**: the root component defines the template and style for all nested view components,

***
Follow the **demo of 10 Vue Apps** on https://vue3-full-course.netlify.app/
**My solutions of 8 Vue Apps can be found on** https://gitlab.dclabra.fi/Lee-Lilly/my_vue_app
## App Demo (Part I: Vue 3 features)
**Hero list** (user can add a hero name to the display list or remove name from the list)

***
**Slot content in Modal** (using **slot** to pass different content as parameter for rendering in the same modal, which allows template to be reusable)

***
**Slider** (**router-view** with **named transitions**, which makes animated effect on navigation)

***
**Markdown App** (installed ***[vue-markdown-it](https://github.com/JanGuillermo/vue3-markdown-it)*** package to sanitize and transcribe the input text. Reactive feature is implemented by using **template ref**)


***
**Calculator** (Use **grid-column style** to create calculator layout with buttons. Data includes the current display, chosen operator and number. Methods include getting chosen operators and numbers via pressing buttons, also the un-displayed basic math calculations)


***
**Calendar** (install **[vue-simple-calendar](https://github.com/richardtallent/vue-simple-calendar)**, which shows month, date, year, week days, and back-forth scrolling enabled. We can add event to the calendar, and remove an event by clicking on the calendar and confirm deletion via a dialog)


## App Demo (Part II: fullstack with databases)
**User Crud** (json-server database and axois http service)
- install ***json-server*** as database for json data files, install **axios** for fetching data

- Test **json-server** and **dataset** in json format (**./src/data/user.json**)

- Various **table** packages available for Vue, did following try:
- Tried to use *[vue-good-table](https://github.com/xaksis/vue-good-table)* package to display user data, but due some feature does not support Vue3, report compile failure.
- Installed ***[vue3-table-lite](https://github.com/linmasahiro/vue3-table-lite)*** package to display user data in table. Customize the look in "node_modules/vue3-tabel-lite/src/components/Table.vue"
- A good alternative would be **[Vue Material Table](https://vuematerial.io/components/table)**, pagination is coming soon, stay in tune.
- Open **json-server**, use asynsc await **axios.get(*'resources'*)** fetching data from 'Resources'.


- Use 'checkbox' API to select 'rowsKey' for deleting multiple users.

- Get specific user data, send as props to update form

- Update user with updated data

***
**Login** (integrate with firebase authentication and firestore database)
- Firebase provides cloud database and login authentication.


- Register user authentication with a unique email.
- Once user authentication is established, add the user details to firestore database.

- Login with firebase authentication

- Routes:
*Login -> Welcome -> Logout*
*Register -> Login -> Welcome -> Logout*


- Apply authentication gards to Welcome page


## What else to mention?
- Options API, Composition API, Reactive API
Through the exercises, I always used options API for defining data, props, methods and created for initial state, emit for sending event payload.
https://v3.vuejs.org/api/options-api.html
Part of Reactive API, such as refs, computed are used in my app. They are light weight and very effective.
https://v3.vuejs.org/api/reactivity-api.html
The composition API is Vue3 new feature. There is a mapping betweent options API and composition API, such as *created : setup*
https://v3.vuejs.org/api/composition-api.html#setup
- Vue UI framework
There is an article writing an overview of Vue UI framework.
https://dev.to/abiolaesther_/an-overview-of-the-top-10-vue-ui-component-libraries-in-2021-3dhm
I am interested in ***PrimeVue***, although I get to know it late. It has 80+ UI components and fully support Vue3. https://www.primefaces.org/primevue/showcase/#/
- Vuex
It helps to handle state of data outside of the Vue components. Since we build simple apps here, I have not much knowledge about it.
https://vuex.vuejs.org/#what-is-a-state-management-pattern