Routa Platformer Tutorial (Part 1/2)
===
[TOC]
# **Tutorial**
## Preface
This document guides the reader in setting up a Routa Engine development environment and creating a simple 2D platformer using Routa Engine.
The tutorial will be in two parts: This first part will guide in setting up a development environment and basic usage of Routa Engines features while the second part will explain how the demo project (```examples/platformer_tutorial/```) works and show a bit more complex project structure in practice.
The example code is in no way perfect and (may) contain bugs and duplicated code. Feel free to refactor and improve the existing example for future users! :)
### Routa Engine
[Routa Engine](https://www.routaengine.fi) is a robust cross-platform 2D game engine developed by students at KAMK over the years. Routa Engine uses the [Entity-Component-System (ECS)](https://en.wikipedia.org/wiki/Entity_component_system) architecture which enables great modularity even at runtime and high performance even with large numbers of objects.
### Prerequisites:
You can reach the end result just by following this tutorial but if you know the following stuff it will be much easier and more worthwile:
- Basics of C/C++ programming
- variables, functions, data types, declarations, assignments, classes, inheritance, polymorphism, methods
There won't be any heavy memory management stuff or such coming up so don't worry! We'll keep it simple. :)
### What will you learn?
You will learn about setting up Routa to start your own development endeavors and you will gain some insight on how some basic game coding could be done. The architecture and naming scheme of Routa is quite similar to other engines on the market so it should shorten your time to get accustomed to <insert game engine here> in the future.
### Abbreviations used in this tutorial
Typing is a lot of work, as is reading long texts! So what about abbreviating some of the terms that will be used in the tutorial:
| Abbreviation | Explanation |
| -------- | -------- |
| Routa | Routa Engine |
| VS | Visual Studio |
## Setting up a Routa Engine environment
So, you want to create a game using Routa Engine? Where do we start now?
"Simple!": Let's start by grabbing everything required by following these steps:
1. ```git clone``` Routa Engine repository
2. Create a project folder
3. Clone a template project to get started
4. Build Routa Engine and set up a Visual Studio solution
Let's break these steps down:
### 1. ```git clone``` Routa Engine repository
Okay! We need Routa to do anything. This can be done by using ```git clone``` by doing the following steps:
1. Open your git shell of choice. I'm using *[Git Bash for Windows](https://gitforwindows.org/)*.
2. Navigate to your development folder (I'm using ```C:/Users/%USERNAME%/dev/routa-project``` with the ```cd <filepath>``` command so your terminal looks similar to this:

> ```%USERNAME%``` is a Windows macro that automatically changes to your username
> You can also Right-Click (or Shift+Right-Click depending on your context menu settings) inside the folder and select "Git Bash here" to skip the ```cd``` command altogether!
3. Run ```git clone https://repo.kamit.fi/routa/routaengine.git```:

All right! We just cloned the Routa repository into our own project folder. You can use the ``ls`` command to verify this:

Yep, ```routaengine/``` indeed exists!
But now we only have the source code... We'll still have to **build** the engine to start using it and before we build it we must create our own project folder:
### 2. Create a project folder
We'll start our project by creating a project folder. There's two paths you can take here: version control or just a raw file structure. I'd definitely recommend version control to make development across different machines and in a team a breeze while also enabling you to log, compare or even revert any changes desired.
Let's see how to do this..
Navigate to ``` routaengine/examples ``` in the terminal by using the ```cd ``` command again: 
You can see that blue (merge_master) in there. That shows which **branch** we are on in the Routa repository but don't worry about it or what it shows for you. You will probably see (master) there. At the time of writing this tutorial, master-branch was not working but merge_master had the most up-to-date source code.
> master is the main branch (trunk) of a repository where you can branch out of and then merge your branch with your new features back into
Next, choose the desired path:
#### No version control (:thumbsdown:):
There's no additional steps at this point for starting development without version control but you need to remember to **take frequent backups** and **save your work often**
You are also losing out on portability of your development environment since you now have to carry a storage device with you that has your project on it.
Developing in a team is also very difficult this way as Git offers great tools for this purpose.
#### With version control (:thumbsup:):
If you want to use version control, go to your version control platform of choice and refer to the instructions on creating a repository there. I'm using [GitLab](https://about.gitlab.com/) so this is what I did to initialize a new repository:
1. I created a new project as [guided here](https://docs.gitlab.com/ee/gitlab-basics/create-project.html)
* I recommend naming the project slug clearly, like ```my-routa-game``` for example (I am using ```platformer_tutorial```)
2. ```git clone``` that new Git project to ```routaengine/examples/```:

Here you can see my terminal was where we previously left it (```routaengine/examples/```) and I issued ```git clone``` with my new project path I got from step 1. Then I issued the ```ls``` command to verify the folder is there and then used ```cd platformer_tutorial/``` to navigate my terminal to that folder. Here you might notice that the blue (merge_master) changed to (master) because I effectively changed the repository the terminal is looking at so that verifies further that we indeed are in our own, new repository!
Now we have version control! I'd recommend grabbing a ```.gitignore``` as not to bloat the repository. ```.gitignore``` tells Git what files you don't want to include in your commits, for example Visual Studio generates a heap of temporary files that aren't relevant to the project.
A great tool for grabbing a ```.gitignore``` is the [gitignore.io](http://gitignore.io/) site:

Just type a keyword like I typed ```VisualStudio``` and ```VisualStudioCode``` and the website generates a ```.gitignore``` for you! Then you only have to replace the old ```.gitignore``` contents in your project with the new contents shown on the page, simple!
> ```.gitignore``` is a special file, it's *hidden* and it's actually nameless with only a file type specified. Windows doesn't really like such files and creating a new one is easier with a text editor: Save As -> All filetypes -> .gitignore -> Save
> If you have trouble seeing the file, make sure your File Explorer settings allow showing hidden files (and known file types)
Now when you are uploading your changes, you won't be uploading the useless bloat and keep your repository nice and tidy while also making sure that every team member has their personal environment config instead of what you would have just pushed.
Now our file structure looks as follows:

> ```ls -a``` shows hidden files
### 3. Clone a template project to get started
Now our version control is set up and we need a Visual Studio project to start developing our game. This can be done by copy-pasting the contents of ```routaengine/examples/template``` to our project folder. After doing this your file structure should similar to this:

Next we need to make sure that the project is unique to Visual Studio so let's change the name by opening ```routaengine/examples/my-routa-game/CMakeLists.txt``` and changing the TEST_PROJECT_EXE variable to our desired project name:

Here I changed the old ```template_msvc``` to ```platformer_tutorial``` so this is what we'll see after building Routa.
> CMakeLists.txt is used by Routa.bat when building the engine. This file specifies settings and files for the generation of a Visual Studio solution/project. Routa.bat calls every CMakeLists.txt found under any subfolder
### 4. Build Routa Engine and set up a Visual Studio solution
Start by navigating to the cloned Routa repository: ```routaengine/```. It should look similar to this:

Here we can find the file ```Routa.bat```. **Try running it!**
Now you will see a huge command line window that shows the ongoing build status:

This can take a little while so it might be a good idea to grab a fast coffee at this point. When it's done, a Visual Studio window will open for you with the ```routa-project\routaengine\buildMSVC\Routa.sln``` solution loaded in.
> ```Routa.bat``` builds the engine and all the projects inside ```routaengine/examples``` and generates Visual Studio files for us to play with.
> If the Visual Studio window doesn't automatically open for some reason, you can open it manually too after building with the .bat
We're done! Routa Engine is built and we have a generated Visual Studio solution to start creating our game on. Next step will be finding our project inside our solution and building that to make sure it's set up properly:
### Test our new project
Navigate to our project in the Solution Explorer, right-click it and select "Set as StartUp Project":

This will make our project automatically start when we press the green play button (i.e. build and debug). This change reflects in the Solution Explorer by bolding the project name in Solution Explorer.
After this just press the green play button and you should see this:

All right! Our new project is set up and it builds and starts as expected!
> The teal screen comes from ```MyScene``` constructor: ```col.setHSV(172, 73, 55, 100);``` where the parameters are ```Red, Green, Blue, Transparency(Alpha)```
Now we are ready to start developing a game using Routa!
But before we do that, let's commit and push our new project state to our version control so we don't accidentally lose this working state and can always revert back to it if (and when) we do something that breaks everything.
Start by saving all and closing Visual Studio to prevent some "file from being in use" errors.
```git add .``` to add all modified files inside our repository into our commit
> the ```.``` parameter means everything, you can use it with a folder too: ```git add some-folder/.```. This would add everything inside some-folder to our commit! (Subfolders and their subfolders/contents too)
```git commit -m "initial commit: teal test screen"``` to commit our added files with the message "initial commit: teal test screen"
```git push``` to push our newly crafted commit to our version control. This uploads everything that you ```git add```ed
This would look something like this:

All right, everything went as expected and by going to our repository page in a web browser, the push is reflected there, great!
> If you are unsure what you are committing and what not you can use ```git status``` to see the current state of your repository. Untracked and unstaged (red) files are not being committed, tracked (green) files are being committed. Unstaged files are deleted and modified files and untracked files are new files not yet in repository, ```git add .``` will make everything red change to green
> You can do multiple ```git add .``` and ```git commit -m ""``` combinations and then ```git push``` multiple commits at once. Remember to commit often and keep your commit messages concise and descriptive to make future reverts and merges easier! See more in the git documentation, it's a very powerful tool.
## Creating a game using Routa
Okay, first things first. Let's have a quick overview on how Routa architecture is set up:

Routa Engine basic ECS-architecture
What is this nonsense you ask?
Let me explain, this is what an entity-component-system hierarchy basically looks like. An <span style="color:lightgreen"> entity</span> has multiple <span style="color:lightblue"> components</span> that belong in a <span style="color:lightgrey"> system</span>.
So for example, we spawn an <span style="color:lightgreen"> entity</span> in the game scene and attach a <span style="color:lightblue"> Health-component</span> on it. Then we spawn an another <span style="color:lightgreen"> entity</span>, a bullet, and attach a <span style="color:lightblue"> Damage-component</span> on it. These <span style="color:lightgreen"> entities</span> are updated by Routa and these <span style="color:lightblue"> components</span> are updated by a <span style="color:lightgrey"> system</span> responsible for those components. These <span style="color:lightblue"> components</span> can interact with each other and their respective <span style="color:lightgreen"> entities</span> so for example in this case, the bullets <span style="color:lightblue"> Damage-component</span> would deal damage to the <span style="color:lightblue"> Health-component</span> and when the <span style="color:lightblue"> Health-components</span> health value is reduced to zero, the <span style="color:lightblue"> Health-component</span> will then destroy it's parent <span style="color:lightgreen"> entity</span>.
Why all this nonsense when I could do this simply in the Character and Bullet-classes you might ask?
Well, think about modularity. Now we can attach these two <span style="color:lightblue"> components</span> to <span style="color:lightgreen"> *any entity*</span> and make them have the same functionality of dealing and receiving damage. This <span style="color:lightblue"> Damage-component</span> could be attached to a bullet, a sword, an enemy turret or the <span style="color:lightblue"> Health-component</span> could be attached to any character, pickup, destroyable game objects etc.
That in mind, it's a good idea to design your components as non-dependent of each other as you can to increase modularity.
All right, the basics out of the way, let's see how we can actually accomplish this magic using Routa.
### Template inspection
Okay, how to create entities then? Let's start by inspecting the template code we have:
```cpp
#include "myscene.h"
#include "unittest_cpp/UnitTest++/UnitTest++.h"
#if defined(__ANDROID__)
/* TODO_android: hide android entry point with macro */
int engine_main(struct android_app* app, re::Engine* engine);
#include <core/AndroidMain.cpp>
int engine_main(struct android_app* app, re::Engine* engine)
{
// Android entry point
MyScene menuscene(engine);
engine->SetScene(&menuscene);
return engine->Run();
}
#else
int main(int, const char *[]) // renamed to stop the program from starting here
{
/* Create engine instance and window widht and height. */
re::Engine engine(800, 600);
/* Every scene must have pointer to engine
* Create main menu and one game scene: */
//MyScene myscene(&engine);
MyScene menuscene(&engine);
/* Set the mainmenu scene to be the starting scene. In this example only one scene
* is used, but in reality multiple scene could be eather created here or
* in scenes' own logic. */
engine.SetScene(&menuscene);
/* Start the engine. */
engine.Run();
return 0;
}
#endif
```
main.cpp
This is what our main looks like. We have some Android-specific engine starting code which we'll ignore as it's out of scope of this tutorial but let's inspect the Windows main-function (after the ```#else``` clause):
```cpp
re::Engine engine(800, 600);
```
We are creating an instance of the engine with 800x600 resolution. Great. This is the back-bone.
```cpp
MyScene menuscene(&engine);
```
We are creating an instance of a scene type of *MyScene* and pass the engine as a reference. This is our own code we will be creating. Don't worry about ```menuscene```, we will only be doing a game scene and leave you with the challenge of figuring out how to switch scenes. Typically there's a main menu scene which transitions onto a game scene when pressing the Play-button there. This reduces memory footprint and increases performance.
You can change the name to whatever you want, just make sure to reflect in the next line:
```cpp
engine.SetScene(&menuscene);
```
We are setting the active scene to be used to be the one we just created.
```cpp
engine.Run();
```
Lastly, we start the engine with the scene we set and our game appears on the screen. Except we have no game yet so maybe we should start by creating a entity to start with. This, like everything else will be done in our scene class ```myscene.h / myscene.cpp``` so let's inspect that:
```cpp
#ifndef MY_ROUTA_SCENE_H
#define MY_ROUTA_SCENE_H
#include <vector>
#include <core/Routa.h>
/* USAGE:
* Every scene must inherit re::Scene.
* Pointer to engine must be given as parameter to re::Scene.
* Systems are per scene.
* Every scene must override 'void Tick()'-function in which the scene's logic
* is placed.
*/
class MyScene : public re::Scene
{
public:
/* Scene's constructor passes the re::Engine pointer to re::Scene
* and initializes all systems needed in this scene.
* Pointers to systems are stored to private variables.
* Root entity is also created in the constructor. Pointer to root entity
* is stored in a private variable and is used to spawn all the needed
* entities to this scene.
*/
MyScene(re::Engine* engine);
re::Camera2D* GetCamera() { return m_camera; };
/* Overridden Tick()-function holds the game logic used in this scene.
* For this example's purposes, logic remains quite small but user could
* expand this logic via inheriting or expanding the logic to separate
* files.
*/
void Tick(double dt) override;
private:
/* Pointer to engine. Initialized in the constructors initializer list. */
const re::Engine* m_engine_ptr;
/* Pointers to systems. Systems are initialized in the constructor. */
#if !defined(__ANDROID__)
re::AudioSystem* m_audio_system;
#endif
re::GraphicsSystem* m_graphics_system;
re::PhysicsSystem* m_physics_system;
re::ClickableSystem* m_clickable_system;
re::AnimationSystem* m_animation_system;
/* Pointers to certain constant entities and components: */
re::Entity* m_player;
re::Entity* m_background;
re::Entity* m_floor;
re::Entity* m_text;
re::Camera2D* m_camera; /* Follows player most of the time. */
re::Entity* m_map;
};
#endif
```
myscene.h
Starting from the first row, take note of the *include guards* ```#ifndef MY_ROUTA_SCENE_H``` and ```#define MY_ROUTA_SCENE_H``` which ends in the last line to ```#endif```. This **must** be included in every single header file you create and use. This is used so that when building the project, the header (and the included headers) cannot be included multiple times and cause compilation errors. This is a good practice in every C++ project.
Now, moving forward we see that ```MyScene``` derives from ```re::Scene``` publicly which is what every scene must derive from to enable functionality. Deriving privately would hide the ```re::Scene``` methods from your other code.
We have a constructor with the engine pointer as a parameter, a ```GetCamera()``` method that returns a pointer to the scene camera and a ```Tick(double dt) override;``` which is where all the logic happens, ```dt``` gives the method delta time to give framerate-independent and time-dependent functionality to the method and it's set as override which means that the ```re::Scene``` default Tick-method will be overridden by this new functionality.
> ```dt``` is the amount of time in seconds the last frame took to execute.
On the private side we have the engine pointer stored we grab from the constructor and various default systems included in Routa: ```re::AudioSystem``` to handle audio if not using Android like we're not, ```re::GraphicsSystem``` to handle graphical output to screen, ```re::PhysicsSystem``` to handle realistic physics in our game using Box2D physics engine, ```re::ClickableSystem``` to handle clickable buttons/menus, ```re::AnimationSystem``` to handle sprite animations.
There's also some default suggestive ```re::Entity``` members and as you can see, everything is an ```re::Entity``` in Routa, except components like the ```re::Camera2D```. The camera is always needed to show anything (it's our viewport to the game scene).
> If you don't create a camera, Routa will use a default, unmodifiable viewport.
Moving on to the implementation in the .cpp:
```cpp
#include "myscene.h"
#include <string>
#include <iostream>
#include <cassert>
#if !defined(__ANDROID__)
#include <audio/AudioListener.h>
#endif
#include <graphics/SpriteAnimationComponent.h>
MyScene::MyScene(re::Engine* engine)
: re::Scene(engine) /* Engine pointer passed to re::Scene */
, m_engine_ptr{ engine }
#if !defined(__ANDROID__)
, m_audio_system{ nullptr }
#endif
, m_graphics_system{ nullptr }
, m_physics_system{ nullptr }
, m_animation_system{ nullptr }
, m_player{ nullptr }
, m_background{ nullptr }
, m_floor{ nullptr }
, m_camera{ nullptr }
{
/* Just to be sure */
assert(m_engine_ptr);
/* Systems that this scene uses are added here.
* Names given as strings must match the type name without the scopea
* operator 're::'.
*/
#if !defined(__ANDROID__)
m_audio_system = this->CreateSystem<re::AudioSystem>("AudioSystem");
assert(m_audio_system);
#endif
m_graphics_system = this->CreateSystem<re::GraphicsSystem>("GraphicsSystem");
re::ColourRGBA8 col;
col.setHSV(172, 73, 55, 100);
m_graphics_system->Init(re::GL,col);
assert(m_graphics_system);
m_physics_system = this->CreateSystem<re::PhysicsSystem>("PhysicsSystem");
assert(m_physics_system);
m_animation_system = this->CreateSystem<re::AnimationSystem>("AnimationSystem");
assert(m_animation_system);
/* Set world gravity */
m_physics_system->SetGravity(re::Vector2(0.0f, -10.0f));
}
void MyScene::Tick(double dt)
{
}
```
myscene.cpp
In the constructor ```MyScene::MyScene(re::Engine engine)``` we are using an initializer list to pass parameters around: We are passing the given engine pointer parameter to the base class and setting the rest of the ```MyScene``` members to ```nullptr```. This is important as Routa will go to Panic-mode if there's a dangling pointer somewhere. Setting them explicitly to ```nullptr``` is a good idea in basically every case.
Next we are creating the systems with a ```std::string``` id to make them findable in our code and afterwards ```assert```ing they have been created (if they still were nullptr at assert, the engine would panic).
Lastly, we set the world gravity to be 0.0f in the x-axis and -10.0f in the y-axis. You could change this to -9.81f to be accurate if you'd like.
Then there is the empty ```MyScene::Tick(double dt)``` method, this is where all the logic will go that happens every engine tick. 60 FPS = 60 ticks per second, 1000 FPS = 1000 ticks per second. This is where ```dt``` comes in. ```dt``` is the amount of time the last frame took to execute and by multiplying values by this, we will have framerate-independent code where an action takes just as long on 60 FPS as it will take on 1000 FPS.
### First entity (player)
Okay. We now have some basic idea on what's happening. Let's create an entity. We will do this in the scene constructor after everything that's already there:
```cpp
auto player = static_cast<re::Entity*>(this->GetRoot()->SpawnChild());
```
Wow.. what?! Let's break it down:
* ```auto```
* deduces the resulting type automatically
* ```static_cast<re::Entity*>();```
* statically (pre-runtime) casts whatever is inside the parentheses to ```re::Entity*```
* ```this->GetRoot()->SpawnChild();```
* Gets the root entity of the scene (every scene has one automatically) and spawns a child entity to it.
Pressing play still shows us the same teal screen but no entity? Well, it's only an entity still, so basically just a container for components and we need a ```re::SpriteComponent``` to give it a visual. Let's see how we would go about this:
### Attaching a component (sprite, box collider)
Add this line under our entity creation:
```cpp
auto playerSprite = static_cast<re::SpriteComponent*>(player->AttachComponent("SpriteComponent"));
playerSprite->Init(
re::Vector3(0.0f, 0.0f, 0.0f),
re::Vector2(1.0f, 1.0f),
re::Vector4(0, 0, 1, 1),
re::ColourRGBA8(255, 255, 255, 255),
m_graphics_system->LoadImage("images/player.png")
);
```
Wow... what?!
Let's break it down again..
* We already know about ```auto``` and ```static_cast```
* ```player->AttachComponent("SpriteComponent");```
* This is the actual component creation. We attach a component to our newly created ```player``` entity with the ```std::string``` id of the component (SpriteComponent). This id is specified in the same way as the system specifiers in the system creation in the constructor but done inside the systems. We'll get into this later on when we create our own system.
* ```playerSprite->Init(...)```
* This is basically the components constructor. This will be used to set initial values or fire some initalizing sequences of actions inside the component. In the case of ```re::SpriteComponent``` it's expecting several values:
* Offset: Coordinates relative to parent entity where to display the sprite, z-value is used for layering
* Width/height: Physical size of the sprite
* UV coordinates: [Texture coordinates](https://docs.microsoft.com/en-us/windows/win32/direct3d9/texture-coordinates) of the sprite to use. ```(0, 0, 1, 1)``` is the whole image file
* Colour: Red, Green, Blue and Alpha(transparency) values of the image. You usually want ```(255,255,255,255)``` here as not to shade the image and give it full opacity. Change the last value to make it transparent.
* Texture: Actual OpenGL texture to use, we are using the graphics system to load an image: The ```LoadImage()``` method reads an image file and converts it to an GLTexture for us to use here
All right! Try testing again and see what happens

Huh... A black box?
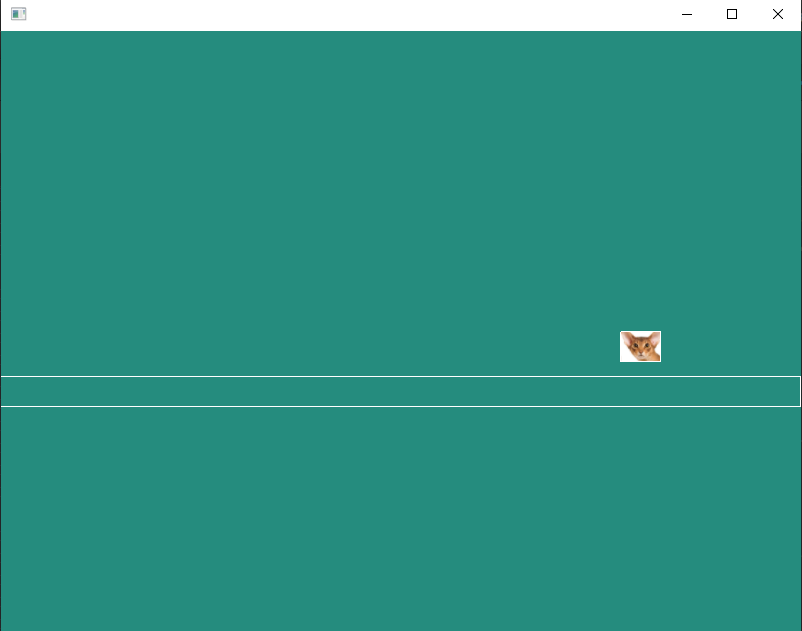
It's because if you look at the ```LoadImage(...)``` line of the sprite initialization, you can see that it uses the filepath of ```images/player.png```.
If you go to your project folder (for me it is ```routa-project/routaengine/examples/platformer_tutorial/```) you will find that there is no ```images/``` so create that folder in there and download or create your player sprite with the name ```player.png``` and try running your game again:

Yay! Our player entity is now visible to the player!
Our "game" is pretty static at this point. Let's give the player some physics to make it interact with the world:
```cpp
auto playerCollider = static_cast<re::BoxColliderComponent*>(
player->AttachComponent("BoxColliderComponent"));
```
By adding that after the sprite initialization in the constructor we give the player a box collider. Routa automatically attaches physics to every collider so try running the game again:

Oh no, the player now falls to it's oblivion straight from the get-go.
Let's create a platform to catch them:
### Second entity (platform)
Same procedure, create a child entity to the scene root and attach a box collider to it:
```cpp
auto platform = static_cast<re::Entity*>(this->GetRoot()->SpawnChild());
auto platformCollider = static_cast<re::BoxColliderComponent*>(
platform->AttachComponent("BoxColliderComponent"));
```
Now, how about not making the same mistake again with the platform. Let's make the physics body (```RigidBody```) static instead of dynamic:
```cpp
platformCollider->SetType(re::RigidBody::StaticBody);
```
By default, every ```RigidBody``` is dynamic. Let's see what options we have:
* dynamic
* A normal physics object, reacts to forces and collisions
* static
* A frozen physics object, doesn't react to forces but reacts to collisions
* kinematic
* A physics object that reacts to forces but doesn't react to collisions
We are choosing static here as the platform doesn't use forces but we only care about the collisions to keep the player on top of it.
We should also offset the platforms position to be below the player, otherwise the player will either fall through it as it is already intersecting it or will get shot out by a physics impulse so:
```cpp
platform->SetPosition(re::Vector3(0.0f, -2.0f, 0.0f));
```
This sets the platform entity 2 units downwards on the screen.
Testing the game again results in the player entity staying on the screen again, with physics!
It is pretty useful to see where to colliders are while creating our game so let's enable Routas debug drawing feature in the constructor:
```cpp
m_graphics_system->ToggleDebugDraw();
```
This simply draws the colliders which are normally invisible to the user.
Let's see what they look like:

Oh no, they look like an error code? Why did this happen?
Time to debug: Visual Studio shows us the error happened in the ```GetCameraMatrix()``` method so it implies we have a problem with our camera. Looking at the variable view in VS shows us that ```m_camera_matrix``` has ```null``` values all around! How come?
Right... we never set up that crucial ```re::Camera2D``` [I mentioned earlier in this section](#Template-inspection). Routa has a default camera to get a basic window up an running quickly but we need to set up our own to do anything meaningful so let's do that in the constructor before our ```ToggleDebugDraw()``` call:
```cpp
m_camera = static_cast<re::Camera2D*>(GetRoot()->AttachComponent("Camera2D"));
m_camera->Init(20, 20);
```
Here we use the scenes root entity as our entity to attach the camera to and then initialize it with it's width and height values. ```(20,20)``` means that the camera will show a 20 units wide and 20 units high viewport.
Running the game again now shows us the viewport of our new camera and the debug drawing feature works as expected:

That's quite a small platform to be standing on if you ask me! Let's try stretching it:
```cpp
platformCollider->SetSize(re::Vector3(20.0f, 1.0f, 0.0f));
```
Very straight forward, set the colliders size to x: 20.0 / y: 1.0
Did it work? Let's test:

Yep! Now we have a platform to stand on.
Let's review what we have done and what our code now looks like:
### Review
```cpp
#include "myscene.h"
#include <string>
#include <iostream>
#include <cassert>
#if !defined(__ANDROID__)
#include <audio/AudioListener.h>
#endif
#include <graphics/SpriteAnimationComponent.h>
MyScene::MyScene(re::Engine* engine)
: re::Scene(engine) /* Engine pointer passed to re::Scene */
, m_engine_ptr{ engine }
#if !defined(__ANDROID__)
, m_audio_system{ nullptr }
#endif
, m_graphics_system{ nullptr }
, m_physics_system{ nullptr }
, m_animation_system{ nullptr }
, m_player{ nullptr }
, m_background{ nullptr }
, m_floor{ nullptr }
, m_camera{ nullptr }
{
/* Just to be sure */
assert(m_engine_ptr);
/* Systems that this scene uses are added here.
* Names given as strings must match the type name without the scopea
* operator 're::'.
*/
#if !defined(__ANDROID__)
m_audio_system = this->CreateSystem<re::AudioSystem>("AudioSystem");
assert(m_audio_system);
#endif
m_graphics_system = this->CreateSystem<re::GraphicsSystem>("GraphicsSystem");
re::ColourRGBA8 col;
col.setHSV(172, 73, 55, 100);
m_graphics_system->Init(re::GL,col);
assert(m_graphics_system);
m_physics_system = this->CreateSystem<re::PhysicsSystem>("PhysicsSystem");
assert(m_physics_system);
m_animation_system = this->CreateSystem<re::AnimationSystem>("AnimationSystem");
assert(m_animation_system);
/* Set world gravity */
m_physics_system->SetGravity(re::Vector2(0.0f, -10.0f));
auto player = static_cast<re::Entity*>(this->GetRoot()->SpawnChild());
auto playerSprite = static_cast<re::SpriteComponent*>(player->AttachComponent("SpriteComponent"));
playerSprite->Init(
re::Vector3(0.0f, 0.0f, 0.0f),
re::Vector2(1.0f, 1.0f),
re::Vector4(0, 0, 1, 1),
re::ColourRGBA8(255, 255, 255, 255),
m_graphics_system->LoadImage("images/player.png")
);
auto playerCollider = static_cast<re::BoxColliderComponent*>(
player->AttachComponent("BoxColliderComponent"));
auto platform = static_cast<re::Entity*>(this->GetRoot()->SpawnChild());
platform->SetPosition(re::Vector3(0.0f, -2.0f, 0.0f));
auto platformCollider = static_cast<re::BoxColliderComponent*>(
platform->AttachComponent("BoxColliderComponent"));
platformCollider->SetType(re::RigidBody::StaticBody);
m_camera = static_cast<re::Camera2D*>(GetRoot()->AttachComponent("Camera2D"));
m_camera->Init(20, 20);
m_graphics_system->ToggleDebugDraw();
platformCollider->SetSize(re::Vector3(20.0f, 1.0f, 0.0f));
}
void MyScene::Tick(double dt)
{
}
```
myscene.cpp
So, we created two new entities ```player``` and ```platform```. Attached collider components ```playerCollider``` and ```platformCollider``` to them, respectively. Set the platform to be static and stretched its size, created a camera and enabled debug drawing.
Next it would probably be a good idea to make our player move. This should probably be done by creating some new components, namely ```MovementComponent``` and ```PlayerController```. ```MovementComponent``` will be moving anything it is attached to and ```PlayerController``` will read player input and move the player according to those inputs. So the controller will house the logic and the other component will just simply move whatever it is attached to by calls from other components wanting to move the entity.
### Adding a new component
#### Component design
We'll start with the movement component first. First, let's design the component. What do we need from the movement component? The ability to move entities, duh.. We are making a platformer game so a good guess would be walking to move horizontally and jumping to move vertically to make our upcoming world traversable.
How would we use the component in code? I think a good way is to just have a single exposed method: ```Move(re::Vector2 direction)```. Then we can have some movement variables in the component such as: ```speed, maxSpeed, acceleration, maxJumpHeight```.
Well, let's crack straight into it and see what we come up with.
#### Component class creation
First, we need a new header file for our custom component. Create that and name it what you'd like. I'm going with ```MovementComponent.h```.
Don't forget the [include guards](#Template-inspection)!
We need to derive the component class from Routas ```re::Component``` publicly to give it component functionality and need the virtual methods to be overridden. The component base class is found in ```core/ECS_collection.h``` and the engine header is in ```core/Routa.h``` so our component template looks something like this:
```cpp
#ifndef MOVEMENT_COMPONENT_H
#define MOVEMENT_COMPONENT_H
#include <core/Routa.h>
#include <core/ECS_collection.h>
class MovementComponent : public re::Component
{
public:
MovementComponent();
virtual ~MovementComponent() {};
void
Init();
virtual void
Tick(double dt) override;
};
#endif
```
MovementComponent.h
Include guards, check. Engine and ECS headers, check. Deriving from base component class, check. Overriding virtual methods, check.
Now we add the movement specific variables and method as discussed earlier. So the ```Move(re::Vector2 direction)``` and ```speed, maxSpeed, acceleration, maxJumpHeight``` etc. We also need to remember to give the Init-method some parameters for these members to make them settable!
We only need to expose the method but not the variables so let's make the method public and the members private so our header looks something like this:
```cpp
#ifndef MOVEMENT_COMPONENT_H
#define MOVEMENT_COMPONENT_H
#include <core/Routa.h>
#include <core/ECS_collection.h>
class MovementComponent : public re::Component
{
public:
MovementComponent();
virtual ~MovementComponent() {};
void
Init(
float maxSpeed,
float acceleration,
float maxJumpHeight,
float jumpForce,
bool autoJump = false,
bool glide = false
);
virtual void
Tick(double dt) override;
void
Move(re::Vector2 direction);
private:
float m_maxSpeed;
float m_acceleration;
float m_maxJumpHeight;
float m_jumpForce;
float m_speed = 1.f;
float m_curJump = 0.f;
bool m_accelerating = false;
bool m_jumping = false;
bool m_isHoldingJump = false;
bool m_blockAutoJump = false;
bool m_autoJumpEnabled = false;
bool m_glide;
bool m_isOnTop;
re::Vector2 m_direction;
re::Entity* m_my_entity;
};
#endif
```
MovementComponent.h
Most of these are self-explanatory and some things will get explained in the implementation part of this component when we get there. Like ```bool m_glide```. Notice how I gave the Init-method parameters for the base movement variables. Now when the component is attached to an entity, we can set it's movement variables using this Init-method, just like the SpriteComponent used it's Init-method to load an image and give it parameters.
> ```Init(...)``` is used to set **init**ial parameters for a component. The actual constructor is called once when the component is registered to a system but ```Init(...)``` can be used as constructors would normally be used in C++. It can also be used to reset components.
Now we have to implement the actual functionality to get the feature in our game!
#### Component implementation
Start by creating a .cpp file including this header. I chose to name my file ```MovementComponent.cpp``` and just included our new header and added our methods in there so the file looks like this:
```cpp
#include "MovementComponent.h"
MovementComponent::MovementComponent()
{
}
void MovementComponent::Init(float maxSpeed, float acceleration,
float maxJumpHeight, float jumpForce, bool autojump, bool glide)
{
}
void MovementComponent::Move(re::Vector2 direction)
{
}
void MovementComponent::Tick(double dt)
{
}
```
Our constructor doesn't need anything as it's usually only used to set members to ```nullptr``` to keep Routa from panicing so we'll leave it empty.
Our Init-method requires the given parameters to be set to the components members. So we'll just add those in:
```cpp
void MovementComponent::Init(float maxSpeed, float acceleration,
float maxJumpHeight, float jumpForce, bool autojump, bool glide)
{
m_my_entity = this->GetEntity();
this->m_maxSpeed = maxSpeed;
this->m_acceleration = acceleration;
this->m_maxJumpHeight = maxJumpHeight;
this->m_jumpForce = jumpForce;
this->m_autoJumpEnabled = autojump;
this->m_glide = glide;
}
```
> m_my_entity is just my chosen coding practice to keep easy track of what entity owns what component. ```this->GetEntity()``` returns the entity the component is attached to
Next, our Move-method should move our entity so let's implement that:
```cpp
void MovementComponent::Move(re::Vector2 direction)
{
this->m_direction = direction;
}
```
Ehh, that's a bit light for movement code don't you think? Nope, that's where the magic comes in, we are going to use the components Tick-method to do the actual movement and use this Move-method just to set the direction to move to so essentially every entity containing this component will "constantly move" in the Tick-method *but not actually if it's not given a direction to move to*.
Lastly, our actual movement code is in the Tick-method:
```clike
void MovementComponent::Tick(double dt)
{
if (m_direction.x != 0)
m_accelerating = true;
else
m_accelerating = false;
if (0 < m_direction.y)
m_isHoldingJump = true;
else
{
m_isHoldingJump = false;
m_blockAutoJump = false;
}
re::BoxColliderComponent* collider = static_cast<re::BoxColliderComponent*>(
m_my_entity->GetComponent("BoxColliderComponent"));
b2ContactEdge* contact = collider->GetBodyPtr()->GetContactList();
float pBottom = this->GetEntity()->GetPosition().y - collider->GetProperty<re::Vector3>("Size").y / 2;
m_isOnTop = false;
// Check if the player is on top of an object or if there's a wall ahead
while (contact)
{
b2AABB contactAABB = contact->other->GetFixtureList()->GetAABB(0);
float cTop = contactAABB.upperBound.y;
if (abs(pBottom) - abs(cTop) < .005f)
{
m_isOnTop = true;
}
contact = contact->next;
}
// Player tries to jump, check if it's possible
if (m_isHoldingJump && !m_jumping && .0001f > abs(collider->GetLinearVelocity().y) &&
m_isOnTop && !m_blockAutoJump)
m_jumping = true;
else
if (m_isHoldingJump && !m_isOnTop && !m_autoJumpEnabled)
m_blockAutoJump = true;
if (m_jumping && !m_isHoldingJump)
m_jumping = false;
if (m_jumping)
{
collider->ApplyLinearImpulseToCenter(re::Vector3(0.0f, m_jumpForce * dt * 100, 0.0f));
if (collider->GetLinearVelocity().y >= m_maxJumpHeight)
m_jumping = false;
}
if (m_accelerating)
m_speed = re::Clamp(m_speed + m_acceleration * dt, 1.f, m_maxSpeed);
else
if (!m_accelerating && 1.f < m_speed)
m_speed = re::Clamp(m_speed - m_acceleration * dt, 1.f, m_maxSpeed);
// If there's a wall ahead, don't add speed (stops wall-clinging)
contact = collider->GetBodyPtr()->GetContactList();
re::Vector3 currentVelocity(collider->GetLinearVelocity());
if (!contact && m_direction.x == 0 && m_glide)
{
collider->SetLinearVelocity(
re::Vector3(currentVelocity.x, currentVelocity.y, 1.0f)
);
}
else
{
collider->SetLinearVelocity(
re::Vector3(m_direction.x * m_speed, currentVelocity.y, 1.0f));
}
}
```
Now that's quite a bit to ingest. Let's go through it:
```cpp
if (m_direction.x != 0)
m_accelerating = true;
else
m_accelerating = false;
if (0 < m_direction.y)
m_isHoldingJump = true;
else
{
m_isHoldingJump = false;
m_blockAutoJump = false;
}
```
If the component is given a direction, we are ```m_accelerating``` and if the given direction is bigger than 0 on the y-axis, we are setting```m_isHoldingJump```.
Then:
```cpp
re::BoxColliderComponent* collider = static_cast<re::BoxColliderComponent*>(
m_my_entity->GetComponent("BoxColliderComponent"));
b2ContactEdge* contact = collider->GetBodyPtr()->GetContactList();
float pBottom = this->GetEntity()->GetPosition().y - collider->GetProperty<re::Vector3>("Size").y / 2;
m_isOnTop = false;
// Check if the player is on top of an object or if there's a wall ahead
while (contact)
{
b2AABB contactAABB = contact->other->GetFixtureList()->GetAABB(0);
float cTop = contactAABB.upperBound.y;
if (abs(pBottom) - abs(cTop) < .005f)
{
m_isOnTop = true;
}
contact = contact->next;
}
```
First, we are grabbing a reference to this components entitys BoxColliderComponent.
Next, we are grabbing the colliders current contacts (with other colliders).
Then, we are calculating the colliders bottom y-coordinate by substracting half of the colliders size from it's center point effectively resulting in the bottom face y-coordinate.
Next we set the ```m_isOnTop``` to false, indicating that the object is not on top of another object currently.
And then we do the actual collision checking in the while loop. Box2D uses this type of contact looping where the ```GetContactList()``` returns a pointer to a list with all the current contacts which can then be looped over and the list advanced by calling ```contact->next```, ready for the next loop.
The contact loop gets the other colliders AABB ([Axis-aligned bounding box](https://en.wikipedia.org/wiki/Bounding_volume)) and gets its top y-coordinate which is then compared with our previously calculated this components entitys bottom collider position and the ```m_isOnTop``` flag is then set accordingly:

When we get out of the collision loop, we'll check the jump conditions:
```cpp
// Player tries to jump, check if it's possible
if (m_isHoldingJump && !m_jumping && .0001f > abs(collider->GetLinearVelocity().y) &&
m_isOnTop && !m_blockAutoJump)
m_jumping = true;
else
if (m_isHoldingJump && !m_isOnTop && !m_autoJumpEnabled) m_blockAutoJump = true;
if (m_jumping && !m_isHoldingJump) m_jumping = false;
if (m_jumping)
{
collider->ApplyLinearImpulseToCenter(re::Vector3(0.0f, m_jumpForce * dt * 100, 0.0f));
if (collider->GetLinearVelocity().y >= m_maxJumpHeight) m_jumping = false;
}
```
So, if the player is holding jump (movement direction is positive on the y-axis from before) and is not already ```m_jumping``` and if the current velocity on the y-axis is less than 0.0001 and ```m_isOnTop``` of an collider and if autojumping is not blocked, we will deduce that the player is currently ```m_jumping```.
Otherwise:
* If the player is holding jump but is not on top of something and autojumping is disabled, autojumping will be blocked.
* If the player is jumping but not holding jump, we will deduce that they will not be ```m_jumping```
* If the player is indeed ```m_jumping```, we will add a physics impulse to the player, propelling them upwards every tick, until the ```m_maxJumpHeight``` is reached which then forces ```m_jumping``` to be false to disable gaining extra height.
> Notice how the ```m_jumpForce``` is multiplied by ```dt``` to give it framerate independency. Otherwise the jumps would be completely tied to framerate.
> Also, keep in mind that the Tick-method is called every frame!
All right, that's vertical movement out of the way, how about horizontal movement? It comes next:
```cpp
if (m_accelerating)
m_speed = re::Clamp(m_speed + m_acceleration * dt, 1.f, m_maxSpeed);
else
if (!m_accelerating && 1.f < m_speed)
m_speed = re::Clamp(m_speed - m_acceleration * dt, 1.f, m_maxSpeed);
```
Before, we deduced if the player is ```m_accelerating```, if that is the case we set the new ```m_speed``` to propel them forward (or backward) by adding ```m_acceleration``` amount of acceleration to the current ```m_speed``` but do it inside ```re::Clamp(value, min, max)``` so we will always move between ```1.f``` and ```m_maxSpeed``` speed.
Next we make sure to also decelerate the player by checking if we are not ```m_accelerating``` anymore and under ```1.f``` ```m_speed```, reducing ```m_speed``` accordingly.
All right, we have every variable calculated now so we'll only have to do the actual movement:
```clike
// Check if the player is on top of an object or if there's a wall ahead
while (contact)
contact = collider->GetBodyPtr()->GetContactList();
re::Vector3 currentVelocity(collider->GetLinearVelocity());
if (!contact && m_direction.x == 0 && m_glide)
{
collider->SetLinearVelocity(
re::Vector3(currentVelocity.x, currentVelocity.y, 1.0f)
);
}
else
{
collider->SetLinearVelocity(
re::Vector3(m_direction.x * m_speed, currentVelocity.y, 1.0f));
}
```
We'll check if there's any collider contacts and if there's none and there's no horizontal movement desired and we have enabled ```m_glide``` we'll set the entitys (or ```RigidBody```s) velocity to remain the same it was. ```m_glide``` is a flag to let the player(or some entity) fly through the air on the same speed for more exciting movement mechanics. Otherwise they would decelerate normally, stopping in the air after releasing the movement key.
On the other hand, if there is horizontal movement desired, we will set the velocity to be the movement direction times our calculated ```m_speed``` to actually move the entity.
We have a movement component armed and ready! Let's attach it to the player entity and test it:
```cpp
auto movement = static_cast<MovementComponent*>(player->AttachComponent("MovementComponent"));
movement->Init(20, 5, 10, 50, true, true);
```
myscene.cpp
Again, same way to attach and initialize a component as before with our colliders and sprite components.
Let's check if it compiles by pressing Play:

Time to debug, again.. Let's see..
VS threw us in ```ECS_collection.h``` telling us ```this``` was ```nullptr```. Scrolling up we can see that it happened inside the Component-class of Routa. So ```this``` refers to Component.. So our component doesn't exist even if we attached it the same way as anything else before?
...
Remember [when I mentioned](#Attaching-a-component-sprite-box-collider) that components must be assigned a typeid (of type ```std::string```) in their respective system? Yeah, we forgot to do that. Let's do that next.
#### Registering and updating components
So we need to register the component to a system, but what system?
Should this be in the physics system maybe since it's doing physics stuff?
Nope, that system belongs to Routa and we will not modify it. We'll create our own ```PlatformerSystem``` to handle our custom code.
### Adding a new system
How to create these systems, you ask? Start by creating a new header for it, I say.
I named mine ```PlatformerSystem.h```:
```cpp
#ifndef PLATFORMER_SYSTEM_H
#define PLATFORMER_SYSTEM_H
#include <core/ECS_collection.h>
// Create a system that manages our components
class PlatformerSystem : public re::System
{
public:
PlatformerSystem(); // Default constructor
virtual ~PlatformerSystem(); // ALWAYS virtual destructor, to make sure that the base class's destructor calls this
void
Tick(double dt) override; // Override the tick-function
void
Init(); // If your system needs further initializing, call this after creating the system
};
#endif
```
So let's break it down again:
* Include guards
* Include ```core/ECS_collection.h```
* Derive publicly from ```re::System```
* Virtual overrides
Basically super similar to the component creation before.
Next create the .cpp for the header, ```PlatformerSystem.cpp```:
```cpp
#include "MovementComponent.h"
PlatformerSystem::PlatformerSystem()
{
// Register the components that belong to this system
this->CreateComponentType<MovementComponent>("MovementComponent");
}
PlatformerSystem::~PlatformerSystem()
{
// If needed to cleanup memory, do it here
}
void PlatformerSystem::Tick(double dt)
{
/* Update registered components here
First, find all the components of that type
*/
re::ArrayPool<MovementComponent>* movementComponents =
GetComponents<MovementComponent>("MovementComponent");
/* Next, update found components
*/
for (auto& c : (*movementComponents))
{
c.Tick(dt);
}
}
void PlatformerSystem::Init()
{
// If the system needs further initializing, do it here
}
```
Okay, so we create (register) our new ```MovementComponent``` with ```CreateComponentType``` where the type inside ```<>``` is our class name and the parentheses contain the typeid specifier for it.
We won't be doing anything in the destructor again.
Next, in the Tick-method, we find all the components of type ```MovementComponent``` by using our newly created typeid-specifier and afterwards iterate through every component, calling their Tick-method.
Initialization doesn't require anything this time.
Here you can see some more of the architecture behind Routa (and ECS-systems in general).
There's all these systems which are updated every frame in the engine code, then these systems are assigned components to take care of and update them according to the systems needs.
Usually there would be numerous systems but as we are doing quite a small project we will stick to a single system. This is where all our new components will be added to.
Now we only need to create the actual system in our scene similar to the systems that existed before:
* Add ```#include "PlatformerSystem.h``` to ```myscene.h```:
* Add a ```PlatformerSystem* m_platformer_system``` member to ```myscene.h```
* Make the new member a nullptr before creation to keep Routa from panicing
* Create the system in the scene constructor (```myscene.cpp```)
After these steps our ```myscene.h``` looks like this:
```cpp
#ifndef MY_ROUTA_SCENE_H
#define MY_ROUTA_SCENE_H
#include <vector>
#include <core/Routa.h>
#include "PlatformerSystem.h"
/* USAGE:
* Every scene must inherit re::Scene.
* Pointer to engine must be given as parameter to re::Scene.
* Systems are per scene.
* Every scene must override 'void Tick()'-function in which the scene's logic
* is placed.
*/
class MyScene : public re::Scene
{
public:
/* Scene's constructor passes the re::Engine pointer to re::Scene
* and initializes all systems needed in this scene.
* Pointers to systems are stored to private variables.
* Root entity is also created in the constructor. Pointer to root entity
* is stored in a private variable and is used to spawn all the needed
* entities to this scene.
*/
MyScene(re::Engine* engine);
re::Camera2D* GetCamera() { return m_camera; };
/* Overridden Tick()-function holds the game logic used in this scene.
* For this example's purposes, logic remains quite small but user could
* expand this logic via inheriting or expanding the logic to separate
* files.
*/
void Tick(double dt) override;
private:
/* Pointer to engine. Initialized in the constructors initializer list. */
const re::Engine* m_engine_ptr;
/* Pointers to systems. Systems are initialized in the constructor. */
#if !defined(__ANDROID__)
re::AudioSystem* m_audio_system;
#endif
re::GraphicsSystem* m_graphics_system;
re::PhysicsSystem* m_physics_system;
re::ClickableSystem* m_clickable_system;
re::AnimationSystem* m_animation_system;
PlatformerSystem* m_platformer_system;
/* Pointers to certain constant entities and components: */
re::Entity* m_player;
re::Entity* m_background;
re::Entity* m_floor;
re::Entity* m_text;
re::Camera2D* m_camera; /* Follows player most of the time. */
re::Entity* m_map;
};
#endif
```
myscene.h
And our scene constructor looks like this:
```cpp
MyScene::MyScene(re::Engine* engine)
: re::Scene(engine) /* Engine pointer passed to re::Scene */
, m_engine_ptr{ engine }
#if !defined(__ANDROID__)
, m_audio_system{ nullptr }
#endif
, m_graphics_system{ nullptr }
, m_physics_system{ nullptr }
, m_animation_system{ nullptr }
, m_player{ nullptr }
, m_background{ nullptr }
, m_floor{ nullptr }
, m_camera{ nullptr }
, m_platformer_system { nullptr }
{
/* Just to be sure */
assert(m_engine_ptr);
/* Systems that this scene uses are added here.
* Names given as strings must match the type name without the scopea
* operator 're::'.
*/
#if !defined(__ANDROID__)
m_audio_system = this->CreateSystem<re::AudioSystem>("AudioSystem");
assert(m_audio_system);
#endif
m_graphics_system = this->CreateSystem<re::GraphicsSystem>("GraphicsSystem");
re::ColourRGBA8 col;
col.setHSV(172, 73, 55, 100);
m_graphics_system->Init(re::GL,col);
assert(m_graphics_system);
m_physics_system = this->CreateSystem<re::PhysicsSystem>("PhysicsSystem");
assert(m_physics_system);
m_animation_system = this->CreateSystem<re::AnimationSystem>("AnimationSystem");
assert(m_animation_system);
m_platformer_system = this->CreateSystem<PlatformerSystem>("PlatformerSystem");
assert(m_platformer_system);
/* Set world gravity */
m_physics_system->SetGravity(re::Vector2(0.0f, -10.0f));
auto player = static_cast<re::Entity*>(this->GetRoot()->SpawnChild());
auto playerSprite = static_cast<re::SpriteComponent*>(player->AttachComponent("SpriteComponent"));
playerSprite->Init(
re::Vector3(0.0f, 0.0f, 0.0f),
re::Vector2(1.0f, 1.0f),
re::Vector4(0, 0, 1, 1),
re::ColourRGBA8(255, 255, 255, 255),
m_graphics_system->LoadImage("images/player.png")
);
auto playerCollider = static_cast<re::BoxColliderComponent*>(
player->AttachComponent("BoxColliderComponent"));
auto platform = static_cast<re::Entity*>(this->GetRoot()->SpawnChild());
platform->SetPosition(re::Vector3(0.0f, -2.0f, 0.0f));
auto platformCollider = static_cast<re::BoxColliderComponent*>(
platform->AttachComponent("BoxColliderComponent"));
platformCollider->SetType(re::RigidBody::StaticBody);
m_camera = static_cast<re::Camera2D*>(GetRoot()->AttachComponent("Camera2D"));
m_camera->Init(20, 20);
m_graphics_system->ToggleDebugDraw();
platformCollider->SetSize(re::Vector3(20.0f, 1.0f, 0.0f));
auto movement = static_cast<MovementComponent*>(player->AttachComponent("MovementComponent"));
movement->Init(20, 5, 10, 50, true, true);
}
```
Now we have made our new system and component, registered the new component to the new system and created the system in our scene. Let's try to press play to see the next error message to debug:

No errors! We should probably test the Move-method before moving on. So for testing purposes, I will add a Move-call for our player to the scene Tick-method:
```cpp
void MyScene::Tick(double dt)
{
auto movement = static_cast<MovementComponent*>(m_player->GetComponent("MovementComponent"));
movement->Move(re::Vector2(1.0f, 0.0f));
}
```
Now we are using the GetComponent-method of ```re::Entity``` which returns us the component with the typeid given as the parameter. ```static_cast```ing again to get to the movement functionality since the GetComponent-method returns a ```re::Component```.
Notice how I'm using ```m_player``` here instead of ```player``` we defined in the constructor. This is because ```player``` is out of scope and we already had that ```m_player``` in our scene header. We'll need to reflect this in the constructor too by changing everything "```player```" to "```m_player```":
```cpp
MyScene::MyScene(re::Engine* engine)
: re::Scene(engine) /* Engine pointer passed to re::Scene */
, m_engine_ptr{ engine }
#if !defined(__ANDROID__)
, m_audio_system{ nullptr }
#endif
, m_graphics_system{ nullptr }
, m_physics_system{ nullptr }
, m_animation_system{ nullptr }
, m_player{ nullptr }
, m_background{ nullptr }
, m_floor{ nullptr }
, m_camera{ nullptr }
, m_platformer_system { nullptr }
{
/* Just to be sure */
assert(m_engine_ptr);
/* Systems that this scene uses are added here.
* Names given as strings must match the type name without the scopea
* operator 're::'.
*/
#if !defined(__ANDROID__)
m_audio_system = this->CreateSystem<re::AudioSystem>("AudioSystem");
assert(m_audio_system);
#endif
m_graphics_system = this->CreateSystem<re::GraphicsSystem>("GraphicsSystem");
re::ColourRGBA8 col;
col.setHSV(172, 73, 55, 100);
m_graphics_system->Init(re::GL,col);
assert(m_graphics_system);
m_physics_system = this->CreateSystem<re::PhysicsSystem>("PhysicsSystem");
assert(m_physics_system);
m_animation_system = this->CreateSystem<re::AnimationSystem>("AnimationSystem");
assert(m_animation_system);
m_platformer_system = this->CreateSystem<PlatformerSystem>("PlatformerSystem");
assert(m_platformer_system);
/* Set world gravity */
m_physics_system->SetGravity(re::Vector2(0.0f, -10.0f));
m_player = static_cast<re::Entity*>(this->GetRoot()->SpawnChild());
auto playerSprite = static_cast<re::SpriteComponent*>(m_player->AttachComponent("SpriteComponent"));
playerSprite->Init(
re::Vector3(0.0f, 0.0f, 0.0f),
re::Vector2(1.0f, 1.0f),
re::Vector4(0, 0, 1, 1),
re::ColourRGBA8(255, 255, 255, 255),
m_graphics_system->LoadImage("images/player.png")
);
auto playerCollider = static_cast<re::BoxColliderComponent*>(
m_player->AttachComponent("BoxColliderComponent"));
auto platform = static_cast<re::Entity*>(this->GetRoot()->SpawnChild());
platform->SetPosition(re::Vector3(0.0f, -2.0f, 0.0f));
auto platformCollider = static_cast<re::BoxColliderComponent*>(
platform->AttachComponent("BoxColliderComponent"));
platformCollider->SetType(re::RigidBody::StaticBody);
m_camera = static_cast<re::Camera2D*>(GetRoot()->AttachComponent("Camera2D"));
m_camera->Init(20, 20);
m_graphics_system->ToggleDebugDraw();
platformCollider->SetSize(re::Vector3(20.0f, 1.0f, 0.0f));
auto movement = static_cast<MovementComponent*>(m_player->AttachComponent("MovementComponent"));
movement->Init(20, 5, 10, 50, true, true);
}
```
Okay. Let's press play and see if our creation even works..:
Off he goes! Great!
Let's review what we have done and learned about Routa so far:
### Review
* Entities
* Containers for components, does nothing by themselves
* Spawned as a child to an another entity or the scene root entity
* Components
* Entity functionality
* Modular (attachable to any entity)
* Needs a system to update it
* Custom ones can be created by deriving from ```re::Component```
* Systems
* Updates components
* Belongs to a scene (created separately in every possible scene)
* Custom ones can be created by deriving from ```re::System```
* ```re:BoxColliderComponent```
* Enables collisions
* Automatically attaches a ```re::RigidBody``` to enable physics
* Can be resized
* Used to access physics properties of entities
* ```re:SpriteComponent```
* Gives a sprite image or another texture to an entity
* Image can be loaded with graphic systems ```LoadImage(...)```
Now comes the next question. How do we command our player entity instead of them flying off the screen? Let's tie the Move-call to keyboard input:
### Reading input
For reading input, we will be creating that ```PlayerController``` I mentioned earlier. The component will be attached to the player entity. The component will read keyboard input and call the ```MovementComponent```s ```Move(...)``` method to move the entity like we tested before.
So what do we need from it?
* Read input every frame
* ```Move(...)``` on said input every frame
* We will also use it to deduce which way is the player currently looking by a callable method ```IsLookingLeft()```
So our new ```PlayerController.h``` will look something like this then:
```cpp
#ifndef PLAYER_CONTROLLER_H
#define PLAYER_CONTROLLER_H
#include <core/Routa.h>
#include <core/ECS_collection.h>
#include "MovementComponent.h"
class PlayerController : public re::Component
{
public:
PlayerController() {
lookingDir = re::Vector2(1, 0);
lastDirection = 1;
};
virtual ~PlayerController() {};
void
Init() {};
virtual void
Tick(double dt) override;
bool IsLookingLeft();
private:
re::Vector2 lookingDir;
int lastDirection;
};
#endif
```
PlayerController.h
We are cutting some corners on that constructor declaration there by already initializing the values to something sensible. Let's see what the implementation could look like:
```cpp
#include "PlayerController.h"
void PlayerController::Tick(double dt)
{
// Tick-method is run once after despawning an entity and this stops crashing
if (this->GetEntity()->IsDeleted()) return;
re::InputSystem mInput = this->GetScene()->GetEngine()->mInput;
// Get the direction where to move
re::Vector2 movedir = re::Vector2(0, 0);
if (mInput.KeyDown(RE_A) || mInput.KeyDown(RE_LEFT))
movedir.x--;
if (mInput.KeyDown(RE_D) || mInput.KeyDown(RE_RIGHT))
movedir.x++;
if (mInput.KeyDown(RE_W) || mInput.KeyDown(RE_UP))
{
lookingDir.y = 1;
if (movedir.x == 0 && lookingDir.x != 0)
{
lastDirection = lookingDir.x;
lookingDir.x = 0;
}
}
else if (mInput.KeyDown(RE_S) || mInput.KeyDown(RE_DOWN))
{
lookingDir.y = -1;
if (movedir.x == 0 && lookingDir.x != 0)
{
lastDirection = lookingDir.x;
lookingDir.x = 0;
}
}
else
{
if (lookingDir.y != 0) lookingDir.x = lastDirection;
lookingDir.y = 0;
}
if (mInput.KeyDown(RE_SPACE))
movedir.y++;
if (movedir.x != 0)
{
lookingDir.x = movedir.x;
}
MovementComponent* movementComponent =
static_cast<MovementComponent*>(this->GetEntity()->GetComponent("MovementComponent"));
if (movementComponent) movementComponent->Move(movedir);
}
bool PlayerController::IsLookingLeft()
{
if (lookingDir.x == -1 || lastDirection == -1 && lookingDir.x != 1)
return true;
else
return false;
}
```
PlayerController.cpp
No constructor this time since we cut corners in the header and initialized the members there so only ```Tick(...)``` and ```IsLookingLeft()```.
* ```Tick(double dt)```
* First line asks Routa if the entity has already been deleted. If it has, we will just return to circumvent crashing as the Tick-method is called once after despawning an entity.
* We grab the input system from Routa Engine (```mInput```)
* We get the movement direction by setting an empty vectors (```movedir```) member to 1 according to the current keyboard input (```mInput.KeyDown(RE_KEYCODE)```)
* KeyDown returns true when they key is held down. There's a separate method that returns true only once on the initial press but disregards holding (```KeyDownThisFrame(RE_KEYCODE)```)
* We also account for looking up or down
* When we have our desired direction vector ready, we grab the ```MovementComponent``` from the entity this component is attached to and make sure it actually exists
* If it actually exists, we call it's ```Move(..)``` method with our new desired movement direction
Simple enough! Let's see how it works in action. We need to include this component in our scene and ```PlatformerSystem```, register it to the system and attach it to our player entity.
```myscene.cpp```:
```cpp
...
#include "PlayerController.h"
MyScene::MyScene(...) {
...
auto playerController = static_cast<PlayerController*>(
m_player->AttachComponent("PlayerController"));
}
```
```PlatformerSystem.cpp```:
```cpp
#include "PlatformerSystem.h"
#include "MovementComponent.h"
#include "PlayerController.h"
PlatformerSystem::PlatformerSystem()
{
// Register the components that belong to this system
this->CreateComponentType<MovementComponent>("MovementComponent");
this->CreateComponentType<PlayerController>("PlayerController");
}
PlatformerSystem::~PlatformerSystem()
{
// If needed to cleanup memory, do it here
}
void PlatformerSystem::Tick(double dt)
{
/* Update registered components here
First, find all the components of that type
*/
re::ArrayPool<MovementComponent>* movementComponents =
GetComponents<MovementComponent>("MovementComponent");
re::ArrayPool<PlayerController>* playerControllers =
GetComponents<PlayerController>("PlayerController");
/* Next, update found components
*/
for (auto& c : (*playerControllers))
{
c.Tick(dt);
}
for (auto& c : (*movementComponents))
{
c.Tick(dt);
}
}
void PlatformerSystem::Init()
{
// If the system needs further initializing, do it here
}
```
Notice how I put the component updating *before* the movement updating? It makes sense to first grab the input and then move according to input. Otherwise our inputs would be late.
Let's also remove that ```Move(...)``` call from the scene ```Tick(...)``` method and test how the controller works!

It definitely works as expected! Although our jump is waaaaaaaaaay too powerful. The jump force is quite small so why is this?
We haven't set a mass to our player yet! Routa defaults new objects mass to 1.0f, or 1.0 kilograms.
Let's add this to our scene constructor:
```cpp
...
playerCollider->SetMass(50.0f);
```
50kg seems reasonable. Let's test this again:

All right! Now it's quite sensible.
Now we know how to create new entities and components and how to control our player. But how would we go about destroying entities?
### Despawning entities (health, damage)
There's some things to note here:
* Routa hates dangling pointers so we need to detach every component an entity has before destroying it, if possible.
* Tick-methods of entities are called once *after* destroying it (remember that check in the ```PlayerController```?)
Let's make those components mentioned in the start of the tutorial: ```DamageComponent``` and ```HealthComponent```.
* ```HealthComponent```
* Holds a health value
* If this value gets reduced down to zero, destroy the entity
* ```DamageComponent```
* Holds a damage value
* Reduces health from ```HealthComponent``` of the recipient amounting to the damage value
* Single exposed method: ```DealDamage(re::Entity target)```
Quite simple in their essence. This is how I implemented the components:
```cpp
/* Health (Component)
* Holds an amount of health which gets decreased by other components in the project (e.g. DamageComponent).
* When health drops to 0 or below, the __Entity the component is attached to__ is despawned from the scene.
* Be certain you are attaching this to the correct Entity in your Entity-Component hierarchy
*/
#ifndef HEALTH_COMPONENT_H
#define HEALTH_COMPONENT_H
#include <core/ECS_collection.h>
// Create a new component, which inherits the base Component class
class HealthComponent : public re::Component
{
public:
HealthComponent(); // Default constructor
virtual ~HealthComponent(); // ALWAYS virtual destructor, to make sure that the base class's constructor calls it
virtual void
Tick(double) override; // Override the tick-function
void
Init(); // If your component needs further initializing, do it here
void
Init(float desiredHealth); // If your component needs further initializing, do it here
float m_health; // amount, accessed by some damage component
private:
void
_DestroyParent(); // if hp = 0 this gets called to destroy the parent entity
};
#endif
```
HealthComponent.h
There's a float value for the health amount, a Init-method for setting said value and a private method ```_DestroyParent()``` that does what it says, destroys the parent entity (the entity this component is attached to).
> Routa coding convention states that member variables should be named with the prefix "m_" and private methods should always start with an underscore "_". So if you searching for clues in the codebase, this info might help you!
```cpp
#include "HealthComponent.h"
HealthComponent::HealthComponent()
{
// Set the default values for the component here
m_health = 1.0f;
}
HealthComponent::~HealthComponent()
{
// Do any possible memory cleanup here
}
void HealthComponent::Tick(double)
{
// Tick is called every frame
if (m_health <= 0.0f) {
_DestroyParent();
}
}
void HealthComponent::Init()
{
// If your component cannot be initialized directly in the constructor, do it here
}
void HealthComponent::Init(float desiredHealth)
{
// If your component cannot be initialized directly in the constructor, do it here
m_health = desiredHealth;
}
void HealthComponent::_DestroyParent()
{
re::Entity* parent = GetEntity();
parent->Despawn(); // Destroy parent entity
}
```
HealthComponent.cpp
I'm setting the health member to default to 1.0f (never leave members uninitialized if possible) in the constructor. In the Tick-method I'm just checking that if the health is at or under zero and if so, just call that destroy method.
There's the normal Init-method where we can set a custom health value and then the actual destroy method ```_DestroyParent()```. The methods gets the components parent entity with ```re::Component::GetEntity()``` and then calls ```re::Entity::Despawn()``` on it to destroy it.
Now how onto reducing that health amount somehow:
```cpp
/* Damage (Component)
* Holds an amount of damage which gets decreased from HealthComponent when desired.
* Attach this to your projectiles or enemies and call DealDamage(target entity) to
* subtract health from their HealthComponent
*/
#ifndef DAMAGE_COMPONENT_H
#define DAMAGE_COMPONENT_H
#include <core/ECS_collection.h>
// Create a new component, which inherits the base Component class
class DamageComponent : public re::Component
{
public:
DamageComponent(); // Default constructor
virtual ~DamageComponent(); // ALWAYS virtual destructor, to make sure that the base class's constructor calls it
virtual void
Tick(double) override; // Override the tick-function
void
Init(); // If your component needs further initializing, do it here
void
Init(float desiredDamage); // We must do it here to give the component a damage value
bool
DealDamage(re::Entity* &target);
float damage;
};
#endif
```
DamageComponent.h
Pretty much the same template here. Only difference really is that we have an exposed method to deal damage there. The implementation:
```cpp
#include "DamageComponent.h"
#include "HealthComponent.h" // to decrease health (actually deal the damage)
DamageComponent::DamageComponent()
{
// Set the default values for the component here
damage = 1.0f;
}
DamageComponent::~DamageComponent()
{
// Do any possible memory cleanup here
}
void DamageComponent::Tick(double)
{
// Tick is called every frame
}
void DamageComponent::Init()
{
// If your component cannot be initialized directly in the constructor, do it here
}
void DamageComponent::Init(float desiredDamage)
{
// Give the damage component a desired damage value
damage = desiredDamage;
}
bool DamageComponent::DealDamage(re::Entity *& target)
{
if (!target->IsDeleted() && target->HasComponent("HealthComponent")) {
static_cast<HealthComponent*>(target->GetComponent("HealthComponent"))->m_health -= damage;
return true;
}
return false;
}
```
DamageComponent.cpp
Here I need to include the ```HealthComponent``` header to use it in the implementation. The rest is pretty straightforward up until the ```DealDamage(..)``` method. Let's see what's going on there:
* ```DealDamage(re::Entity *& target)```
* ```re::Entity *& target```
* This parameter gets the target entity pointer as a reference
* A reference cannot be NULL so this is extra safety. You could probably pass in only a pointer
* ```if (!target->IsDeleted() && target->HasComponent("HealthComponent"))```
* ```IsDeleted()``` for checking if the entity has not been destroyed yet and ```HasComponent("HealthComponent")``` to make sure there's a health component to access
* ```static_cast<HealthComponent*>(target->GetComponent("HealthComponent"))->m_health -= damage;```
* Gets the health component and reduces the health value by the damage value of this component
* Returns true if damage was dealt or false if damage was not dealt (no health component or destroyed entity)
Now our game characters can have a health value and it can get reduced by dealing damage. We only need to remember to register them to the ```PlatformerSystem``` and make them update:
```cpp
#include "PlatformerSystem.h"
#include "MovementComponent.h"
#include "PlayerController.h"
#include "DamageComponent.h"
#include "HealthComponent.h"
PlatformerSystem::PlatformerSystem()
{
// Register the components that belong to this system
this->CreateComponentType<MovementComponent>("MovementComponent");
this->CreateComponentType<PlayerController>("PlayerController");
this->CreateComponentType<HealthComponent>("HealthComponent");
this->CreateComponentType<DamageComponent>("DamageComponent");
}
PlatformerSystem::~PlatformerSystem()
{
// If needed to cleanup memory, do it here
}
void PlatformerSystem::Tick(double dt)
{
/* Update registered components here
First, find all the components of that type
*/
re::ArrayPool<MovementComponent>* movementComponents =
GetComponents<MovementComponent>("MovementComponent");
re::ArrayPool<PlayerController>* playerControllers =
GetComponents<PlayerController>("PlayerController");
re::ArrayPool<HealthComponent>* healthComponents =
GetComponents<HealthComponent>("HealthComponent");
re::ArrayPool<DamageComponent>* damageComponents =
GetComponents<DamageComponent>("DamageComponent");
/* Next, update found components
*/
for (auto& c : (*playerControllers))
{
c.Tick(dt);
}
for (auto& c : (*movementComponents))
{
c.Tick(dt);
}
for (auto& c : (*damageComponents))
{
c.Tick(dt);
}
for (auto& c : (*healthComponents))
{
c.Tick(dt);
}
}
void PlatformerSystem::Init()
{
// If the system needs further initializing, do it here
}
```
PlatformerSystem.cpp
Same procedure: Include the new headers, create the component types, pool the components and then update the pool of components. I put the update order so that the health component is the last to update so we do all the other spells and incantations of other components before destroying an entity if it's health was zero.
Next we include the new headers in our scene and attach the components to our player entity. I will read input in the scene Tick-method for testing the components:
```cpp
#include "myscene.h"
#include <string>
#include <iostream>
#include <cassert>
#if !defined(__ANDROID__)
#include <audio/AudioListener.h>
#endif
#include <graphics/SpriteAnimationComponent.h>
#include "MovementComponent.h"
#include "PlayerController.h"
#include "HealthComponent.h"
#include "DamageComponent.h"
MyScene::MyScene(re::Engine* engine)
: re::Scene(engine) /* Engine pointer passed to re::Scene */
, m_engine_ptr{ engine }
#if !defined(__ANDROID__)
, m_audio_system{ nullptr }
#endif
, m_graphics_system{ nullptr }
, m_physics_system{ nullptr }
, m_animation_system{ nullptr }
, m_player{ nullptr }
, m_background{ nullptr }
, m_floor{ nullptr }
, m_camera{ nullptr }
, m_platformer_system { nullptr }
{
/* Just to be sure */
assert(m_engine_ptr);
/* Systems that this scene uses are added here.
* Names given as strings must match the type name without the scopea
* operator 're::'.
*/
#if !defined(__ANDROID__)
m_audio_system = this->CreateSystem<re::AudioSystem>("AudioSystem");
assert(m_audio_system);
#endif
m_graphics_system = this->CreateSystem<re::GraphicsSystem>("GraphicsSystem");
re::ColourRGBA8 col;
col.setHSV(172, 73, 55, 100);
m_graphics_system->Init(re::GL,col);
assert(m_graphics_system);
m_physics_system = this->CreateSystem<re::PhysicsSystem>("PhysicsSystem");
assert(m_physics_system);
m_animation_system = this->CreateSystem<re::AnimationSystem>("AnimationSystem");
assert(m_animation_system);
m_platformer_system = this->CreateSystem<PlatformerSystem>("PlatformerSystem");
assert(m_platformer_system);
/* Set world gravity */
m_physics_system->SetGravity(re::Vector2(0.0f, -10.0f));
m_player = static_cast<re::Entity*>(this->GetRoot()->SpawnChild());
auto playerSprite = static_cast<re::SpriteComponent*>(m_player->AttachComponent("SpriteComponent"));
playerSprite->Init(
re::Vector3(0.0f, 0.0f, 0.0f),
re::Vector2(1.0f, 1.0f),
re::Vector4(0, 0, 1, 1),
re::ColourRGBA8(255, 255, 255, 255),
m_graphics_system->LoadImage("images/player.png")
);
auto playerCollider = static_cast<re::BoxColliderComponent*>(
m_player->AttachComponent("BoxColliderComponent"));
auto platform = static_cast<re::Entity*>(this->GetRoot()->SpawnChild());
platform->SetPosition(re::Vector3(0.0f, -2.0f, 0.0f));
auto platformCollider = static_cast<re::BoxColliderComponent*>(
platform->AttachComponent("BoxColliderComponent"));
platformCollider->SetType(re::RigidBody::StaticBody);
m_camera = static_cast<re::Camera2D*>(GetRoot()->AttachComponent("Camera2D"));
m_camera->Init(20, 20);
m_graphics_system->ToggleDebugDraw();
platformCollider->SetSize(re::Vector3(20.0f, 1.0f, 0.0f));
auto movement = static_cast<MovementComponent*>(m_player->AttachComponent("MovementComponent"));
movement->Init(20, 5, 10, 50, true, true);
auto playerController = static_cast<PlayerController*>(m_player->AttachComponent("PlayerController"));
playerCollider->SetMass(50.0f);
auto playerHealth = static_cast<HealthComponent*>(m_player->AttachComponent("HealthComponent"));
playerHealth->Init(100.0f);
auto playerDamage = static_cast<DamageComponent*>(m_player->AttachComponent("DamageComponent"));
playerDamage->Init(10.0f);
}
void MyScene::Tick(double dt)
{
auto input = GetEngine()->mInput;
if (input.KeyDownThisFrame(RE_K)) {
auto playerDamage = static_cast<DamageComponent*>(m_player->GetComponent("DamageComponent"));
playerDamage->DealDamage(m_player);
}
}
```
myscene.cpp
Very straight forward. Let's fire the game up and test if the player takes 10 damage per keypress. It should take 10 hits for our player to get destroyed at 100.0 health:

Yup! Player was destroyed after the tenth keypress!
That concludes the first part of this tutorial as I'm about to hit the character limit.
We will continue creating our game in the next part of the tutorial :sunglasses::thumbsup: (platformer_tutorial_02.md)